From an idea to your classroom wall
How to make and print bulletin board letters
A short heading, a font you like, and a few sheets of paper are enough to get started. Here is how to make one letter per page, choose a useful size and prepare your display.
By FontStyleLab · Examples made with our printable-letter generator
Step 1
Choose a design for the job
For letters students can decorate, start with Outline. Classic bold suits general classroom titles, and Rounded chunky works well for a short welcome. Use a simpler typeface when the heading needs to be read from across the room.
The bulletin board letter collection has six designs. Each offers ready-made uppercase, lowercase and number packs. Choose Customize these letters if you only need the characters in your heading.
Open Classic bold in the editor →

Step 2
Write the heading you want to display
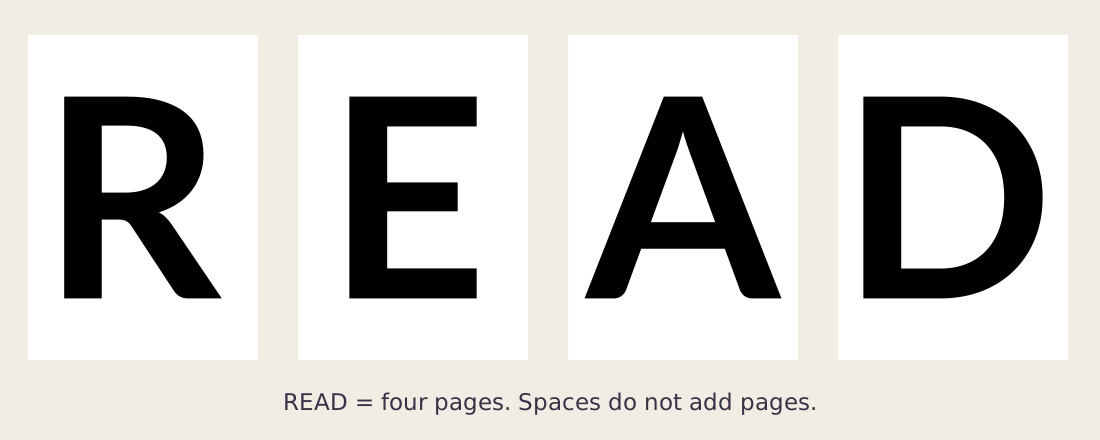
In the editor, replace the example under Your letters. “READ” creates four pages. “OUR WORK” creates seven: the space does not add a sheet. Repeated letters are included, so a phrase such as “WELCOME” contains both E pages.
Keep Letter case set to As typed to preserve your capitalization. Choose UPPERCASE or lowercase when you want the tool to convert it. For more than 60 characters, split the phrase into smaller batches.
To match the four-page example below, enter READ in Your letters. Check the page thumbnails: R, E, A and D should each appear once. Replace READ with your own heading when you are ready.
Step 3
Match the paper and choose a letter size
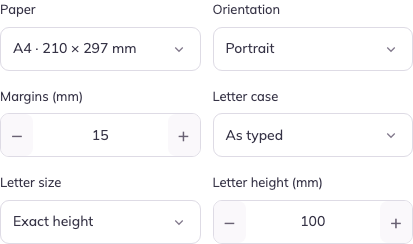
On a phone, tap Customize to open the settings. Select A4 (210 × 297 mm) or US Letter (8.5 × 11 inches), matching the paper in your printer. Start with portrait orientation and 15 mm margins.
When a wide letter does not fit, reduce its requested height or margins, or try landscape. The editor shows an explanation instead of silently shrinking an exact-size letter. Keep enough margin for your printer.
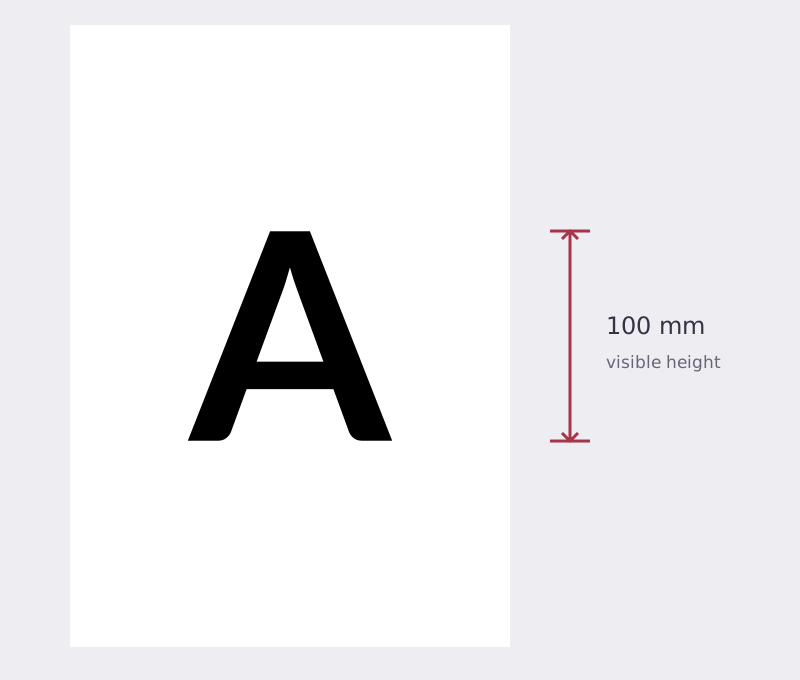
For a 100 mm example, choose Exact height in Letter size, then enter 100 in Letter height (mm). The controls below show that setup. The A diagram explains what is measured; your READ project still contains R, E, A and D.
The ready-made packs use a shared scale across all 62 uppercase, lowercase and number characters for each design and paper size. This lets you combine the three packs with matching proportions. The download list shows the capital H height in millimeters and inches; other characters keep their natural relative heights. A4 and US Letter packs can differ in size.
Custom headings in Fit to page use the characters you enter, so their scale can differ from the ready-made packs or from another heading. Generate your whole heading in one batch when possible. Choose Exact height when matching visible heights matters more than preserving the natural height differences between characters.
Step 4
Download the PDF and print one test page
- Choose Download all pages as PDF in the editor, or download a ready-made pack from the collection.
- Open the PDF and select the matching paper size in your print dialog.
- Choose Actual size or 100%. Turn off Fit, Shrink or Scale to fit when physical size matters.
- Print just one page. Check for clipped edges and measure the visible letter with a ruler if you chose Exact height.
- Once the test looks right, print the remaining pages you need.
On a phone, close Customize with Done, then tap Download PDF in the bottom bar. That button downloads every letter page, not just the page currently visible.
Print-dialog wording and printable margins vary by printer and PDF viewer. If the printout is too small, check scaling first. If an edge is missing, increase the margins in the editor and generate the PDF again.
The PDFs contain vector letter outlines, so their edges can remain sharp when scaled. The final physical result still depends on your printer, paper and settings.
Check your printer with a 10 cm test letter
Use this optional check if your letters print at the wrong size, or before a job where the height matters. If your own test letter already measures correctly, skip this step.
-
Download the test sheet for your paper
Choose the size loaded in your printer. Both PDFs contain a black H exactly 10 cm (100 mm) tall.
-
Print one copy at Actual size / 100%
Open the downloaded PDF. Match the paper size in the print dialog, choose Actual size or 100%, and turn off Fit, Shrink and borderless enlargement. Check printer properties too, if they offer another scale setting.
-
Measure the H on the printed paper
Lay the paper flat and measure the black H from top to bottom with a ruler, reading to the nearest millimeter. The target is 10 cm (100 mm). A tiny difference can come from measuring; a clear size change means you should check the print settings.
What to do after measuring
- The H measures about 10 cm
- Keep these paper and print settings. Print one letter from your actual heading and check its size and edges before printing the rest.
- The H is clearly smaller or larger than 10 cm
- Recheck the paper size and scaling in both the PDF reader and printer settings, then print the test sheet again. For example, 9.6 cm means the page was reduced; enlarging your design would hide the print-setting problem.
Other printing problems
- The size is right, but an edge of my heading letter is missing
- Clipping can be a printable-area problem even when the scale is correct. Increase margins or reposition the letter in the editor, keep Exact height, and export again. If it cannot fit, use larger paper or reduce the requested height deliberately.
- Horizontal and vertical measurements disagree
- The horizontal line on the test sheet should also measure 10 cm between its end marks. If it differs from the H height, measure both again with the paper flat. If the difference repeats, try another PDF reader or printer; changing one scale setting will not fix unequal scaling.
- Letters from separate Fit-to-page exports do not match
- Fit to page depends on the characters in each batch. Generate the complete heading together for consistent proportions, or use Exact height when equal visible heights matter. Keep the same paper and print settings for every batch.
Why Fit changes the size: a worked example
To compare settings on your printer, print a second copy with Fit and measure the H again. For example, 9.6 cm instead of 10 cm means it printed 4% smaller. You can use the recording spaces on the PDF; there is nothing to enter on this page.
These are software measurements, not measurements from a physical printer. We measured the H outline in the generated PDF, then measured it again after fitting the complete page inside a simulated 5 mm non-printable margin on every edge. Your printer may use different margins.
| Matching paper | H in the source PDF | Simulated Fit scale | H after simulated Fit |
|---|---|---|---|
| A4 | 100.00 mm | 95.24% | 95.24 mm |
| US Letter | 100.00 mm | 95.37% | 95.37 mm |
The calculation uses the smaller of printable width / PDF width and printable height / PDF height. For A4 with these margins, the width sets the scale: 200 / 210. PDF path bounds confirm the resulting letter height; this does not validate a printer’s mechanical accuracy.
The editor’s Fit to page chooses the letter size before export. A PDF reader’s Fit rescales the entire exported page afterward, including a letter made with Exact height. These are separate settings.
Step 5
Cut out and arrange the whole phrase
Cut around the letters and remove enclosed spaces where needed. Lay out the entire heading before attaching anything. Use the visual gaps between letters as your guide; equal distances between the paper edges can look uneven once the paper is removed.
For an outline activity, let students decorate the letters before cutting. For younger students, have an adult handle scissors and small enclosed cutouts.
Check the finished heading from the distance where people will read it. Adjust spacing or simplify nearby decorations if the words are hard to make out.
Was this guide useful?